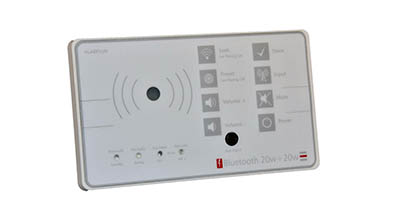
How to program custom settings into a KLABPLUS in-wall amplifier
The free KLABSETUP software provides installers with the means to customise each KLABPLUS amplifier as required before final installation. Specifically, you can edit:
- Bluetooth ID
- Bluetooth PIN
- FM preset stations
- Bass level
- Treble level
- Balance
- Loudness
- Bluetooth pairing timeout
- Inactivity timeout
- Perform full factory reset
Getting started
You will need:
- The KLABLINK USB programming cable
- A PC runnings windows 7 or higher or Mac running OSX
- A KLABPLUS in-wall amplifier with power supply
Step 1 - connect the cable to the PC
Connect the KLABLINK cable to a spare USB port on your PC and allow the OS to install drivers if prompted to do so. If your OS does not automatically install the required drivers please install as appropriate from this list:silicon labs USB UART drivers
Step 2 - launch the software
Launch the softwareThe KLABSETUP program can be downloaded here Download the zipped file and extract to a folder of your choice.
Windows users: locate and double click the file called "klabsetup.exe". There is no need to install the software it will run directly as an executable file.
Mac users: locate and double click the file called "klabsetup.jar". If all is well the program will launch. If you see an error message it is most likely because your version of Mac OS X did not ship with Java as standard. please refer to Apple support and follow their instructions to resolve.
Step 3 - connect the cable to the KLABPLUS
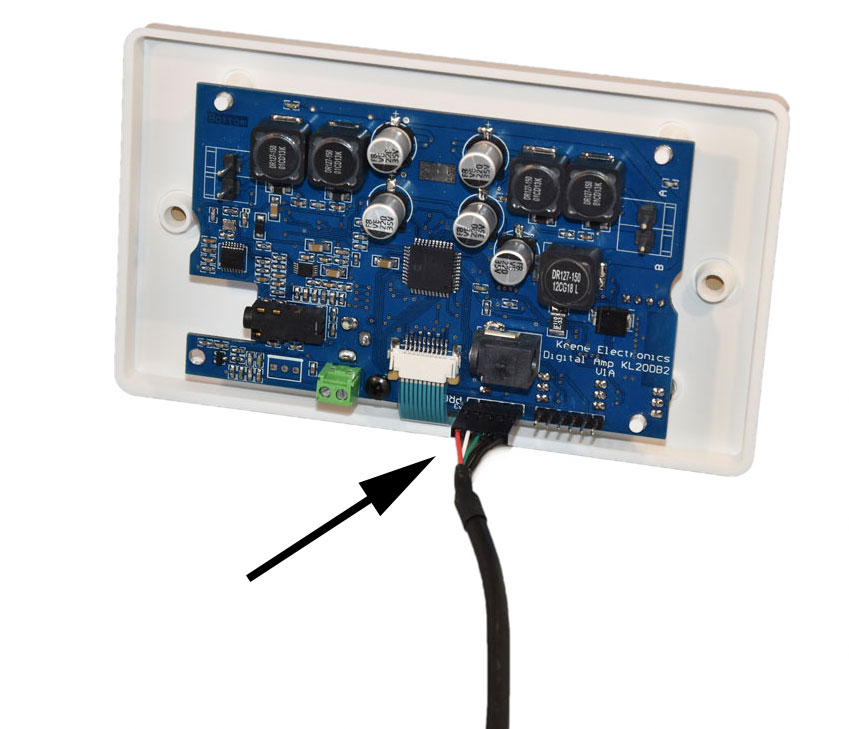
Connect the KLABLINK cable to the header pins on the KLABPLUS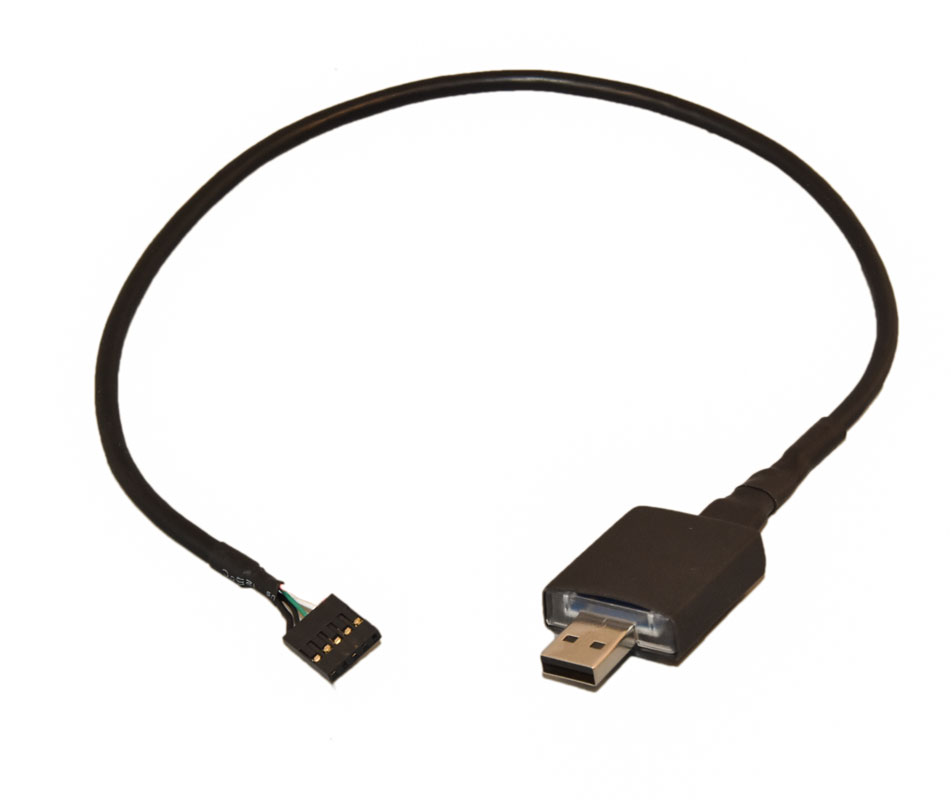
Step 4 - select the com port and test the connection
When you plug the KLABLINK cable into your PC it is assigned a new virtual com port. That is the reason you need to plug the cable in before launching the KLABSETUP program as it will not recognise a com port created after it is launched.Usually the program will default to com1. Click on the drop down and select the next available com port. If you have no other com ports available close the program and re-launch whilst making sure the KLABLINK cable remains connected. If you have multiple com ports available try each in turn until you get a response.
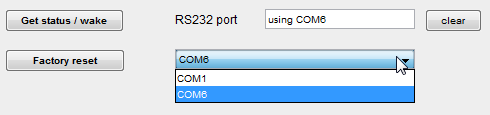
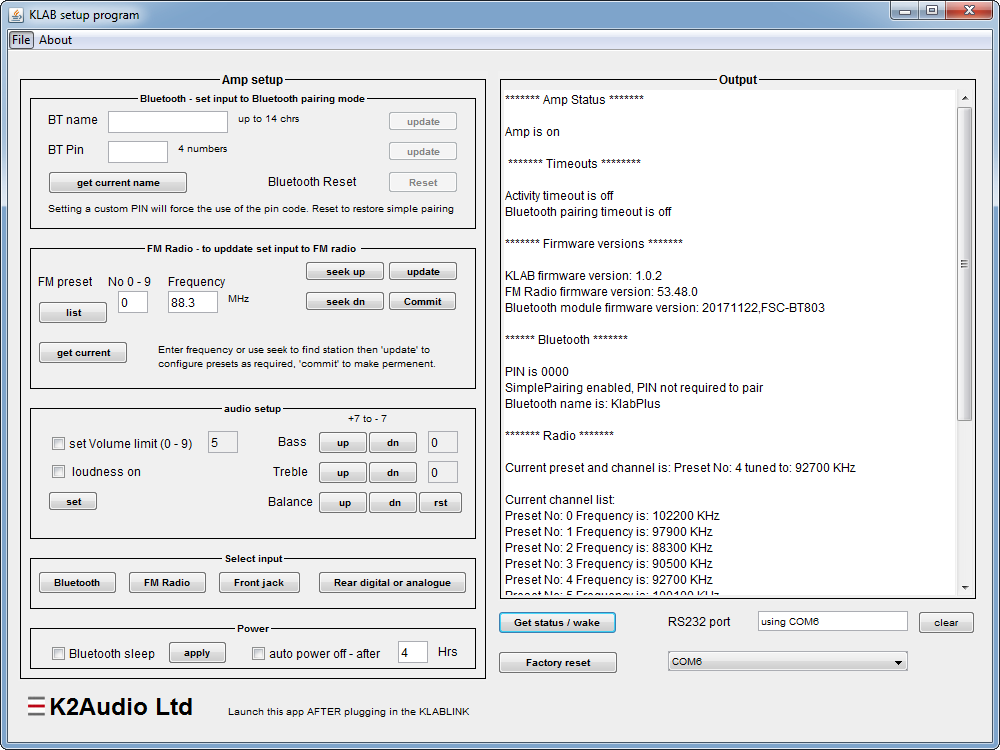
Click " get status/wake" at the bottom of the status window panel. If all is well you should now see the current amplifier status and formation displayed. If there is no response check that the correct com port is selected. If no alternative com ports are available check for any reported errors in device manager and refer to the driver list in step 1.
Step 5 - program the KLABPLUS
Operation is fairly straightforward but here is a quick overview of the options:
BLUETOOTH
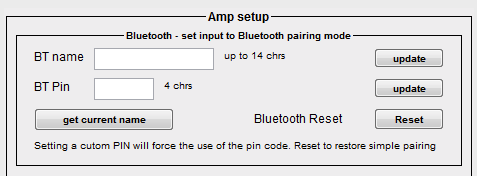
Note that the update and reset buttons will be greyed out and inneffective if bluetooth is not selected as the active input)
BT name = type into the box the bluetooth ID you would like to use for the KLABPLUS (max 14 characters) and press " update" when you are ready. The KLABPLUS will reboot at this point and restart with the new ID.
BT PIN = Enter a PIN of 4 digits and press "update" when you are ready. The KLABPLUS will reboot at this point and restart with the new PIN requirement for pairing.
Get current name = report all of the current settings into the output window
Reset = Restore factory settings for name and PIN
Please note that when you pair with bluetooth devices the ID is usually stored in your device along with its unique MAC address. If you then change the ID from say Study to Lounge it may well still appear in your device list as Study if this has been previously paired. Sometimes this may be the case even if you have not previously paired with it. To force the name to change you will need to pair to the device, then perform a “forget this device” or “unpair”, then rescan and re-discover it under the latest device ID.
FM RADIO
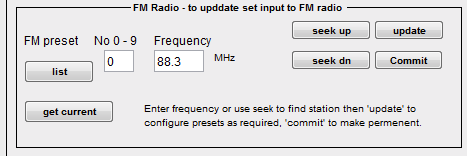
List = report all of the current FM presets into the output window
Seek up & Seek dn = force the FM tuner to hunt up or down for a valid FM signal. When one is found the signal will be audible and the frequency reported in the window. If you would like to save this station enter a preset number (0-9) and press " update".
If the seek option does not stop at your desired station you can also type directly into the window and press "update" to force the tuner to a specific frequency. This can be a good way to test aerial positioning and signal strength before final install.
When you have completed the station list as desired press "commit" to store your presets in the KLABPLUS memory.
AUDIO
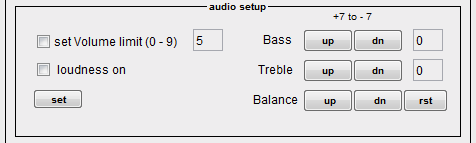
Set volume limit = The KLABPLUS has 256 steps for volume from 0 through to 256 maximum. The number keys on the remote control provide a quick way to jump between these in 10 steps - number 0 is the lowest and number 9 is maximum output. If you decide that number 7 is the loudest you wish the system to go, type 7 into the box, check volume limit and click " set". The maximum output will now be capped accordingly.
Bass, treble and balance = adjust as required and click "set" when the desired setting is reached.
Loudness = check the box and click "set" to save as desired.
(note - bass, treble, balance and loudness can be also adjusted again using the remote control after installation, the volume limit cannot be overridden).
POWER

Bluetooth sleep = if checked the system will remain ready to pair with a bluetooth device for 15 minutes. If no successful pairing takes place within this time the KLABPLUS will revert to standby. Factory default for this setting is OFF.
Auto power off = The KLABPLUS will monitor infrared remote and keyboard activity (eg volume or input change). If no command is detected within x hours the KLABPLUS will revert to standby. To apply enter the desired time, check the box and click " apply". Factory default for this setting is OFF.
RESET
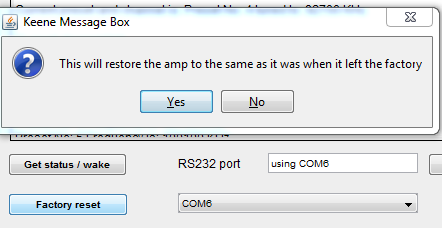
Clicking the reset will restore the KLABPLUS to the same settings as when it left the factory. The procedure will restore all settings to default including any changes that have been made to stored radio stations, balance, treble, bass and loudness. The reset will also affect the Bluetooth ID and the preset FM radio stations.
We hope you find this program useful. If you wish to give feedback please send any suggestions and comments to sales@k2audio.co.uk