Connections & Indicators
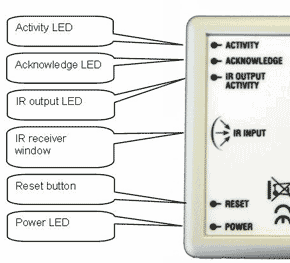
Activity LED
Will flash:
Twice per second = looking for another module or computer on the network
Once every five seconds = found another module or computer on the network.
(see “advanced settings” for compatible computer information)
Acknowledge LED
Will flash to confirm that data has been successfully transmitted to the target - in other words your message got there! (see "port forwarding" for more details)
IR Output Activity LED
Will flash whenever IR is sent to the IR emitter.
IR Receiver Window
Aim your remote control at this.
Reset Button
If you get a problem with one of the modules, pressing the reset switch until the acknowledge light comes on will reboot the module with the current settings. Can also be used for a full factory reset as detailed on the reset link opposite.
Power LED
Should always be illuminated whenever power is connected. Don't expect much to happen if it's not.
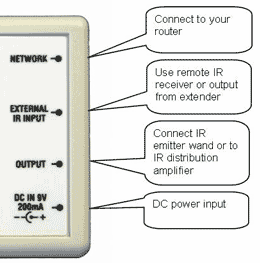
Network
Should be connected to a hub switch or router, and not directly cabled to your computer network port. If you can't run a network cable to the desired location you can optionally connect your KIRA128 to your home network using either a pair of plug-in powerline adapters or a wireless Ethernet Bridge.
External IR Input
Allows you to connect an external IR receiver to the module. Useful for several reasons:
It would allow you to place the KIR128 module out of sight, inside a cabinet for example.
The built-in IR receiver works within the (very common) 36 - 40KHz bandwidth. You can optionally connect a wideband IR receiver to cover the 20 - 120KHz bandwidth if required.
You can also connect directly from the IR output of other IR extender systems using one of the optional cables. See "Accessories" for details.
IR Output
To be connected to the IR emitter wand, or to the input of an IR distribution system. Supplied as standard with a close range emitter wand, other options are available as listed under "Accessories".
Power
Requires a minimum of 7v and maximum of 9v DC (regulated) at 200mA or greater, 2.1mm DC socket, centre positive.