Learning IR Code
To learn an IR code
The basic procedure is capture, test (optional but sensible) and save, although as you’ll see there are plenty of options.
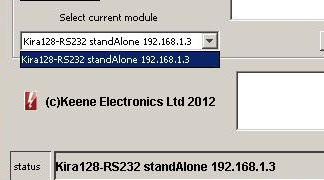
First of all you must check that the module IP address is set to that of the IR Anywhere module you wish to use. This should be shown in the status window in the bottom LH corner as below.

If the module IP is NOT displayed then please follow the "Locating the Modules" procedure.
If you have more than one module on the network then choose the required IP from the drop down menu.
Before attempting to learn IR codes please check the following:
Note1: the module you are capturing from MUST be configured as a receiver or stand-alone and NOT as a target.
Note2: you must have selected (and saved) the “attempt find and send to PC” in the “options” tab of the IR Anywhere module web page. You can also do this by clicking the "send to this PC" button below "Set this PC as the destination for received IR codes".
Note 3: you can check that the module has correctly found the PC by clicking the “Configuration” tab in the modules web page and looking at the “Computer MAC & IP Address”. If the MAC address is showing as all FF’s then it has not successfully communicated with the computer, in which case check all your IP addresses and firewall settings.
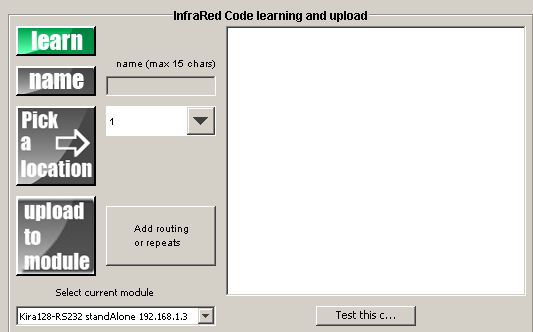
Now click on the green “learn” button and it should turn to a red “stop” button as below.
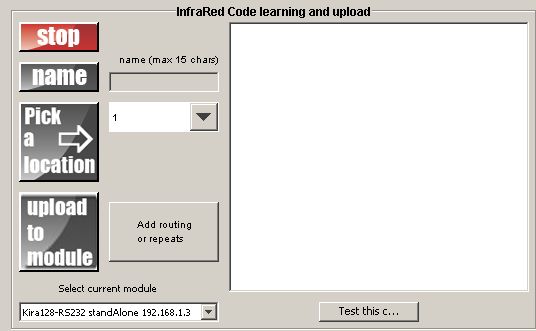
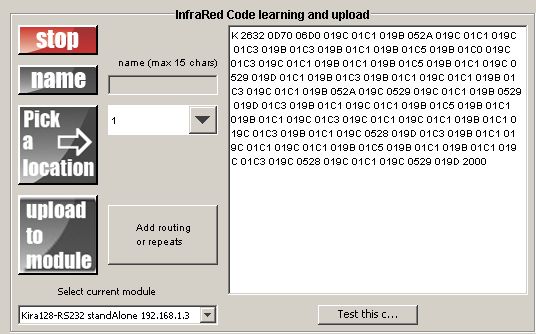
The program is now ready to capture. Aim your remote control at the IR sensor on the module (see Learning IR code tips opposite) and press the button you wish the module to learn. As soon as the program has captured one complete string of code this will be displayed in the code window.
Now click the "stop" button. You'll now be presented with an option to "tidy" the captured code.

For most applications a tidied code will give more reliable results. There are however some IR code types that do not respond well to the algorithms used in this process and it could make them worse. It is recommended to capture one code, tidy it and then test it. If it performs well then it is best to capture and tidy all of the other required codes from that remote control. Similarly if the captured code does not perform well then recapture without tidying and do the same for the other codes from the same remote.
To test the code, change the status from receiver to target. If all is well you will see “ACK” appear in the reply window to acknowledge that the module has received the code. Your equipment should have responded the same as if you’d pressed the button on the remote control
Once you have successfully tested the code At this point you can then click on the "name" button to give it a suitable name (e.g. DVD menu). Next click "pick a location" and choose the desired location from the drop down menu.
Finally click "upload to module" and the named IR code will then become available as a listed command within the PC Browser and Mobile Browser web pages.
You'll notice that the given name also appears in the code window followed by a "K". (See Learning IR code advanced for a full explanation as to why).
Repeat as required for all the IR codes you wish to learn.
(the "add routing or repeats" function is covered in the "advanced" section)